SDF Application
Silver Diamine Fluoride Application in the Pediatric Primary Care Setting
Children and families without access to a dental home or other oral health resources are at higher risk for dental caries and other oral health issues. By learning to apply silver diamine fluoride solution to dental caries in your clinic, you can help minimize pain and set a course for better oral hygiene habits going forward.
Application is easy and can be completed in four simple steps:
 Prepping the Room
 Applying the Solution
 Prepping Your Patient
 Setting Expectations

How to Prepare Your Room for SDF Application
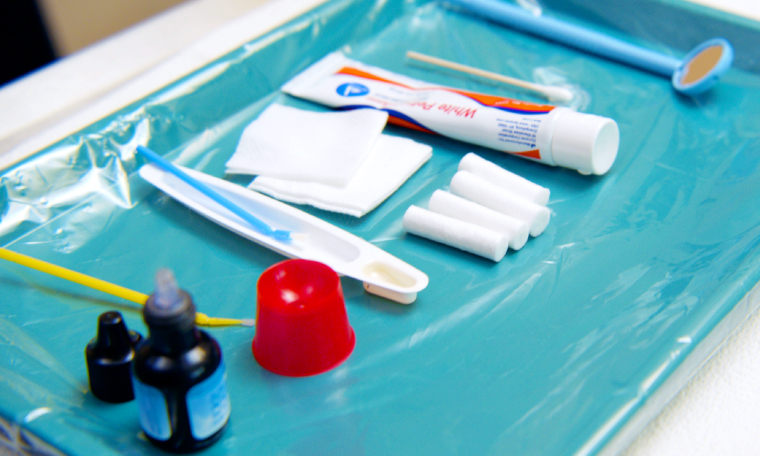
Before starting the SDF and varnish application process, you’ll want to gather all your supplies so you can easily access each item as you go. Because the SDF will cause staining, be sure to wear gloves and protective gear for your clothing and have a bib and protective eyewear for your patient. We also recommend placing a plastic cover over your prepared tray prior to preparing your materials.

What You Need for the Full Application Process
- A disposable mirror to identify any dental caries
- White petrolatum skin protectant or Vaseline to protect the gums and lips surrounding the affected area
- Cotton swabs to apply the protectant
- Gauze to dry the affected area prior to application
- A cotton roll to isolate the area
- Fluoride varnish to apply after the SDF
- A micro brush for applying the SDF
- A disposable container like a dappen dish to hold the SDF solution
- Silver diamine fluoride solution

Time Saving Tip: For easy application, squeeze a pea size amount of the petrolatum skin protectant on your prepared tray, open your varnish and pre-mix, and pour one drop of SDF solution into your disposable container.

How to Prep Your Patient
Address Staining: Start by disclosing to your patient and their guardian that SDF causes irreversible staining on teeth and obtain verbal and written informed consent prior to application. It is highly recommended to include photos of the potential staining on the consent form.
Make Your Patient Comfortable: Once your patient and their guardian are fully aware of the effects of SDF and have consented to treatment, position your patient on the exam table. Make sure your patient has eye protection and a disposable bib on their chest to prevent unwanted, permanent staining.


How to Apply Silver Diamine Fluoride to Stop Decay
Start by identifying the location of the dental caries. Remember, SDF is a pulpal irritant, so it should only be used when the pulp is not involved in the carious lesion.
STEP ONE
Use the disposable mirror to identify any dental caries.
STEP TWO
Apply petrolatum jelly to the surrounding gums and lips so they don’t get stained.
STEP THREE
Use gauze to dry the area you will be working on and remove any debris or plaque from the cavitated lesion.
STEP FOUR
Use a cotton roll to isolate the affected area as SDF can stain soft tissue.
STEP FIVE
Use a micro brush to apply your pre-poured SDF solution to the affected area.
STEP SIX
Allow the SDF solution to dry for 1 minute and retract soft tissue away from lesion.
STEP SEVEN
After the SDF has dried for one minute, apply the pre-mixed fluoride varnish to the same area.
STEP EIGHT
Remove the cotton roll and ask your patient if they would like you to remove the petrolatum skin protectant.

Set Expectations & Review Key Oral Health Habits


Waiting a to Eat or Drink
According to the AAP, if the patient received SDF and fluoride varnish, they should not eat or drink for 30 minutes after treatment. For SDF alone, there is no restriction.

Set a Follow Up
Help your patient schedule a follow up in 3-6 months for reexamination and additional SDF reapplication if needed.

Provide Resources and Guidance
Because this patient is at risk for future dental caries, be sure to review proper oral hygiene habits, provide nutritional counseling, and connect the patient and their guardian with a dental home. If you can, encourage your patient to schedule a follow up appointment with a dental provider for further guidance and treatment. This is also a great time to share any take-home resources you may have on oral health and finding a dental home!
Provider Resources for Managing Pediatric Oral Health Emergencies
Billing & Coding Guidance – information on billing and coding for fluoride varnish and silver diamine fluoride application in Illinois.
Emergency Preparedness Considerations for Pediatric Oral Health Emergencies – information on how pediatricians can optimize oral health during pandemic.
Ensuring Your Team is Prepared for Pediatric Dental Emergencies – information on how to incorporate oral health into your emergency preparedness measures.
Finding a Dental Home – information and resources to help your patients in finding a dental home.
Oral Health Patient Outreach Materials
All About Fluoride – a printable handout for patients sharing more information on fluoride, why it’s needed, and what to expect during application.
Bright & Healthy Smiles Begin at Birth – a printable handout for patients with important information on setting good oral hygiene habits early.
Tips for Transporting a Tooth – a printable handout to hang in high traffic areas or to share with patients that includes key information on the best ways to transport a tooth after it’s been knocked out.
Be Prepared! What to Do for Dental Emergencies – a printable handout to hang in high traffic areas or to share with patients that includes key information on what parents and guardians should do during common oral health emergencies.
